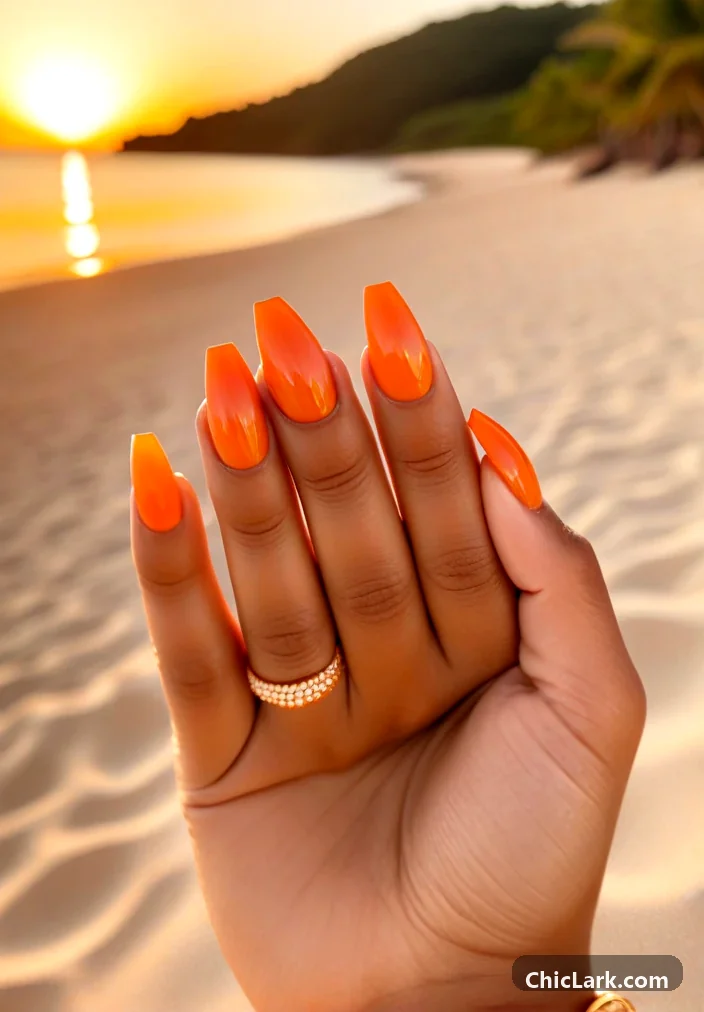

With summer in full swing, there’s no better way to celebrate the season than with a vibrant ombre orange manicure. This striking look captures the essence of sunny days and tropical getaways, making your nails a dazzling focal point. The gradual transition from deep to lighter orange adds a dynamic quality, making each glance a reminder of warmth and joy. It’s a bold yet elegant choice that feels both modern and festive.
Why This Look Works
The ombre orange nails featured here effortlessly blend hues, creating a gradient effect that is both visually appealing and fresh. The long, tapered silhouette not only looks elegant but also elongates the fingers, providing a sophisticated touch. The glossy finish enhances the vibrancy of the colors, capturing light beautifully and making the nails appear well-maintained and chic.

This type of manicure is perfect for those looking to add a pop of color without veering too far from an elegant, polished look.
Choosing the Right Shades
The key to nailing the ombre effect lies in your choice of colors. Here’s how you can create the perfect palette:
- Deep Orange: Start with a rich, dark orange for the base. This sets the tone for a vibrant look.
- Sunset Orange: Transition to a medium, sun-kissed orange for that perfect gradient.
- Pale Peach: Finish with a light, soft peach or coral that complements the deeper shades.
This selection of colors creates a seamless transition and captures the essence of summer sunrises and sunsets.
How to Achieve the Ombre Effect
Creating an ombre effect at home can be an enjoyable DIY experience. Here’s a simple method to get started:
- Prep Your Nails: Start by removing any old polish and shaping your nails into a long, tapered design. Buff and apply a base coat for added protection.
- Base Color: Apply two coats of the deep orange polish for a solid base. Allow it to dry completely.
- Crafting the Ombre: To blend the colors, use a makeup sponge. Paint stripes of each shade on the sponge, then dab it onto your nails, starting with the darkest color at the tip and gradually lightening as you move toward the base.
- Add a Glossy Finish: Once the colors are blended, seal your design with a top coat for a glossy, polished final look.
Styling Your Ombre Orange Nails
Your vibrant ombre orange nails can be paired with various outfits for different occasions:
- Beach Day: Wear them with a breezy white sundress and simple sandals to let your nails shine.
- Evening Events: Match your nails with a sleek black jumpsuit to create a stunning contrast that elevates your overall look.
- Causal Outing: Combine your manicure with denim shorts and a fun floral top for a laid-back yet stylish summer vibe.
Variations for Different Occasions
While ombre orange nails are fantastic for sunny days, consider these variations to suit different seasons or occasions:
- Fall Twist: Incorporate deep reds and yellows for an autumn-inspired palette.
- Winter Glam: Blend oranges with icy blues for a unique winter look.
- Matte Finish: Swap the glossy look for a matte finish for a trendy and sophisticated overall appeal.
Finishing Touches
For an extra layer of elegance, consider adding minimal nail art accents, like tiny gold dots or a delicate nail stripe. This detail can elevate the look without overwhelming the vibrant ombre design. Remember, the goal is to enhance the beauty of the colors while still embracing simplicity.
Your ombre orange nails can be a standout feature this summer, embodying both elegance and fun. With the right colors and application technique, you can embrace this vibrant look while allowing your creativity to shine through. So, rock those gorgeous nails and let summer’s warmth inspire your every look!